Hi there!
Today, I'm thankful... but it's not really as simple as that. I try to be thankful every day for the people, things, and opportunities in my life- and I think I'm pretty successful at doing so. What I have a more difficult time doing is realizing what I take for granted.
I'm thankful for my eyesight. It's been almost 2 months since I regained it with nearly full cooperation of my eyes. One minute, I was talking on the phone and everything seemed perfectly fine. In less than a full second, I couldn't see. Literally. I will never be able to justly describe or explain the feelings I felt in that moment. It was plain scary.
I don't know about you, but when things like that happen, all of the "what if" thoughts rush through my head. My pulse was quickly climbing. I thought that if I cried, I'd somehow make things worse. My right eye felt enlarged... so I kept thinking it'd explode or fall out (I never said my thoughts were rational). When I stood up, I felt dizzy, I couldn't walk straight... in fact, I walked straight into my dresser even though I knew where it was and I actively tried to avoid it.
Once I was at Quick Care (it's a place that's not so quick, but it was closer to my house than the ER), my heart rate was upward of 150. As much as I tried to calm myself, I couldn't stop thinking the worst. Without an explanation for what was happening, there was just no way I could be calm. They had me do their eye chart- you know, the one you stand however far behind and you have to spout off the letters you can see? I questioned the guy on what the point of this test was. I said I could see 3 of him when I could see. I still couldn't stand up straight- my husband had to hold me up. The guy told me to try anyway. So I did. It took quite some time because I had to hold my right eyelid open. And my eyeball burned. You know what he told me after I finished naming off the letters I saw on the eye chart? "You have perfect vision." WHAT!?
I forgot to mention just what my eyes looked like. My left eye and eyelid looked normal. My right eyelid looked like a Pug dog's forehead. My right pupil was dilated so greatly, it was hard to tell the color of my eye. Oh, and the pupil was most definitely not aiming forward. It was as far right as you could imagine it might go.
Anyway, the people at "Quick Care" sent me to an eye doctor. He ran some fancy tests- all of which, I passed with flying colors. He then did the simple "follow my finger" test. He said my right eye seemed like it became disconnected. My eyes were not cooperating together or with my brain. No kidding, Sherlock ;-) He sent me to the ER because he was convinced I had suffered a stroke or had a brain aneurysm.
After a very long MRI, I was told there were absolutely no signs of a stroke or a brain aneurysm. I still had no answers, though. The best the doctors could do was guess. So what it came down to was stress. I had gone through sooo (can I double underline that?) much of it in the hours leading up to that dreadful day that my body couldn't handle it. I was told that basically, just like your feet can swell, your eyes can, too. Fluid behind my right eye more or less exploded and pinched a nerve. Phew! That sounded hopeful. Except that the doctor then told me not to expect a dramatic or quick recovery.
I'm still recovering, and I will be for the next 4+ months. Bright lights and cold temperatures really hurt my eyes. I do feel an occasional burst of pain through my eye and I can't keep my right eyelid open all day. Sometimes I either have to hold it open with a finger or let it close and take a rest. I'm hopeful.
I'm thankful again for my eyesight. I'm confident I'll never take it for granted again. I appreciate being able to see my loved ones, the changing of the seasons, the sky, and that dang pimple on my chin. I feel like I've gone through a journey. As odd as it may sound, it's self-discovery.
There are so, so, so many things to be thankful for. Especially around this time of the year with holiday gifts and such, it's easy to lose sight (heh, no pun intended) of what's really important. Sure, I think it's okay to be thankful for a game console or a new bicycle... those things do bring joy and entertainment- and I think joy and entertainment are necessary components of life. But I urge you to think about the things and abilities you have that you may not notice. It's kind of enlightening.
What are you thankful for that you may have taken for granted in the past?
Until next time...
Tuesday, November 26, 2013
Thursday, July 4, 2013
Patriotic Week - Day 7
Hi there!
This is my Independence Day manicure...
I painted 2 coats of Alpine Snow. Once dry, I applied the foil glue and waited for it to become tacky. Then I pressed the foils over the glue, and... voila! I used Seche Vite as my topcoat.
I was inspired by a combination of this picture...
...and the fact that I've not tried nail foils before. They've been sitting among my nail art supplies for over a year! I think the technique is pretty simple- but more importantly, it was fun to achieve.
To see my other Patriotic manicure ideas, click here.
Welp... I'm off to go down to the waterfront to watch the neighborhood's firework display. I'd love to know how you wore your nails and how you celebrated today/tonight! Stay safe.
Until next time...
This is my Independence Day manicure...
 |
| My nails painted with OPI - Alpine Snow. Patriotic 4th of July nail foil design. |
I painted 2 coats of Alpine Snow. Once dry, I applied the foil glue and waited for it to become tacky. Then I pressed the foils over the glue, and... voila! I used Seche Vite as my topcoat.
I was inspired by a combination of this picture...
 |
| Photo source - avenue.com |
...and the fact that I've not tried nail foils before. They've been sitting among my nail art supplies for over a year! I think the technique is pretty simple- but more importantly, it was fun to achieve.
To see my other Patriotic manicure ideas, click here.
Welp... I'm off to go down to the waterfront to watch the neighborhood's firework display. I'd love to know how you wore your nails and how you celebrated today/tonight! Stay safe.
Until next time...
Wednesday, July 3, 2013
Patriotic Week - Day 6
Hi there!
I enjoyed the sponging of yesterday's manicure, but I wanted something more...
I painted 1 coat of Julep's Brigitte before sponging with First Mate and Hey Sailor. Once dry, I stamped with Konad's special white polish and then topped everything with a coat of Seche Vite.
To see my other Patriotic manicure ideas, click here.
Until next time...
I enjoyed the sponging of yesterday's manicure, but I wanted something more...
 |
| My nails painted with China Glaze - First Mate and Hey Sailor. Stamped with Winstonia plate W107. Patriotic 4th of July manicure. |
I painted 1 coat of Julep's Brigitte before sponging with First Mate and Hey Sailor. Once dry, I stamped with Konad's special white polish and then topped everything with a coat of Seche Vite.
To see my other Patriotic manicure ideas, click here.
Until next time...
Tuesday, July 2, 2013
Patriotic Week - Day 5
Hi there!
This is my manicure today...
I painted 1 coat of Brigitte before sponging with all 3 colors, and then I topped it with a coat of Seche Vite.
I'm thinking that, maybe, this manicure needs something else. I'm not sure what, though. Would you wear it as is, or add something to it?
To see my other Patriotic manicure ideas, click here.
Until next time...
This is my manicure today...
 |
| My nails painted with Julep - Brigitte, Gunta, and Salma. Patriotic 4th of July manicure. |
I painted 1 coat of Brigitte before sponging with all 3 colors, and then I topped it with a coat of Seche Vite.
I'm thinking that, maybe, this manicure needs something else. I'm not sure what, though. Would you wear it as is, or add something to it?
To see my other Patriotic manicure ideas, click here.
Until next time...
Monday, July 1, 2013
Patriotic Week - Day 4
Hi there!
It's the return of Ugly Manicure Monday- Patriotic edition...
I painted 2 coats of Whirlwind White before stamping with Konad's special red and special blue polishes. The plate I used was a generic plate with no identification numbers/letters.
I consider this manicure ugly because the image didn't stamp very well. Part of that was my fault, and part of that was due to the plate being of lower quality. On top of that, I used a top coat that I had never tried before with nail art. I used Color Club's topcoat, and I was completely unaware of how badly it would smear my design. After using it on my index fingernail, I decided to leave the rest of my nails without topcoat.
To see my other Patriotic manicure ideas, click here.
Until next time...
It's the return of Ugly Manicure Monday- Patriotic edition...
 |
| My nails painted with Sally Hansen - Whirlwind White. Patriotic 4th of July manicure. |
I painted 2 coats of Whirlwind White before stamping with Konad's special red and special blue polishes. The plate I used was a generic plate with no identification numbers/letters.
I consider this manicure ugly because the image didn't stamp very well. Part of that was my fault, and part of that was due to the plate being of lower quality. On top of that, I used a top coat that I had never tried before with nail art. I used Color Club's topcoat, and I was completely unaware of how badly it would smear my design. After using it on my index fingernail, I decided to leave the rest of my nails without topcoat.
To see my other Patriotic manicure ideas, click here.
Until next time...
Sunday, June 30, 2013
Patriotic Week - Day 3
Hi there!
I think this is something that anybody can do...
I painted 2 coats of Red Pearl and then painted one diagonal coat of Frostbite. I then used a white striper and Hologram Glitter before topping everything with a coat of Seche Vite.
This manicure doesn't take as much time as one might think since it doesn't require much precision. When applying the blue polish, the line doesn't need to be straight because the white line can easily cover imperfections :-)
To see my other Patriotic manicure ideas, click here.
Until next time...
I think this is something that anybody can do...
 |
| My nails painted with China Glaze - Red Pearl and Frostbite. Art Club - Hologram Glitter. Patriotic 4th of July manicure. |
I painted 2 coats of Red Pearl and then painted one diagonal coat of Frostbite. I then used a white striper and Hologram Glitter before topping everything with a coat of Seche Vite.
This manicure doesn't take as much time as one might think since it doesn't require much precision. When applying the blue polish, the line doesn't need to be straight because the white line can easily cover imperfections :-)
To see my other Patriotic manicure ideas, click here.
Until next time...
Saturday, June 29, 2013
Patriotic Week - Day 2
Hi there!
This is my next idea for a red, white, and blue manicure...
I painted 2 coats of each polish to use as a base. I then used plate W107 and Konad's special white polish to stamp the designs. I topped everything with a coat of Seche Vite.
This was my first time using a Winstonia plate. I flubbed a few places, but I'm quite satisfied with how well this design transferred. The star design looks so crisp!
To see my other Patriotic manicure ideas, click here.
Until next time...
This is my next idea for a red, white, and blue manicure...
 |
| My nails painted with China Glaze - Hey Sailor and First Mate. Stamped with Winstonia plate W107. Patriotic 4th of July Manicure. |
I painted 2 coats of each polish to use as a base. I then used plate W107 and Konad's special white polish to stamp the designs. I topped everything with a coat of Seche Vite.
This was my first time using a Winstonia plate. I flubbed a few places, but I'm quite satisfied with how well this design transferred. The star design looks so crisp!
To see my other Patriotic manicure ideas, click here.
Until next time...
Friday, June 28, 2013
Patriotic Week - Day 1
Hi there!
Like the years past, I'll be toying with new manicure ideas for Independence Day. Here's my first idea...
I painted 2 coats of each polish to achieve what's pictured. I used Seche Vite for my topcoat.
I think this manicure is proof that Patriotic nails can be worn without much effort. It took some serious will power for me to stay away from my stamping plates, but I really do like the simplicity of this look.
To see my other Patriotic manicure ideas, click here.
Until next time...
Like the years past, I'll be toying with new manicure ideas for Independence Day. Here's my first idea...
 |
| My nails painted with China Glaze - Red Pearl and Frostbite. OPI - Alpine Snow and Crown Me Already! Patriotic 4th of July manicure. |
I painted 2 coats of each polish to achieve what's pictured. I used Seche Vite for my topcoat.
I think this manicure is proof that Patriotic nails can be worn without much effort. It took some serious will power for me to stay away from my stamping plates, but I really do like the simplicity of this look.
To see my other Patriotic manicure ideas, click here.
Until next time...
Friday, May 10, 2013
Jamberry Nails - Summer Chevron
Hi there!
This is my first time using Jamberry Nails...
I received a sample page of designs from an independent consultant for Jamberry Nails...

Based on the size of my nails, the strips are large enough to be cut in half and used on 2 nails.
These were easy enough to apply- I heated the wrap with my hair dryer until it was soft and flexible. I then applied it to my nail, used my finger tips to smooth it out, and re-heated it to seal the wrap.
I do have a piece of advice if you've never applied these before... if you're using these for an accent nail, I recommend waiting to paint your other nails until after you've applied the wrap. I painted my nails first, and when the wrap was heated, it accidentally stuck to my middle fingernail. It didn't smudge or pull up my manicure, but it very well could have.
As far as the wear of this manicure- well, it lasted less than 12 hours :-/ The edges lifted while I was in the shower, so I just peeled the wraps off. On the bright side, the removal process was easy!
Overall, I'd recommend these if you want a quick, fun design. For complicated designs, the wraps take less time to apply than free-hand nail art or stamping. I'm not sure I'd choose to do a full manicure with these since the heating process can be fussy- I imagine if a heated wrap grabbed onto a wrap that was already applied, it might pull and ruin it.
Have you used these before? Which designs are your favorite? ... And do you have any tips for first-timers?
Until next time...
This is my first time using Jamberry Nails...
 |
| My nails painted with Essie - Big Spender and Jamberry Nails - Summer Chevron. |
I received a sample page of designs from an independent consultant for Jamberry Nails...

Based on the size of my nails, the strips are large enough to be cut in half and used on 2 nails.
These were easy enough to apply- I heated the wrap with my hair dryer until it was soft and flexible. I then applied it to my nail, used my finger tips to smooth it out, and re-heated it to seal the wrap.
I do have a piece of advice if you've never applied these before... if you're using these for an accent nail, I recommend waiting to paint your other nails until after you've applied the wrap. I painted my nails first, and when the wrap was heated, it accidentally stuck to my middle fingernail. It didn't smudge or pull up my manicure, but it very well could have.
As far as the wear of this manicure- well, it lasted less than 12 hours :-/ The edges lifted while I was in the shower, so I just peeled the wraps off. On the bright side, the removal process was easy!
Overall, I'd recommend these if you want a quick, fun design. For complicated designs, the wraps take less time to apply than free-hand nail art or stamping. I'm not sure I'd choose to do a full manicure with these since the heating process can be fussy- I imagine if a heated wrap grabbed onto a wrap that was already applied, it might pull and ruin it.
Have you used these before? Which designs are your favorite? ... And do you have any tips for first-timers?
Until next time...
Tuesday, April 30, 2013
Neon Leopard
Hi there!
I decided I wanted to match my outfit today, so I added a leopard print to yesterday's manicure...
I used Konad's special black polish to stamp the print and then I topped it with a coat of Seche Vite.
Now this is what I call a fun manicure! What do you think?
Until next time...
I decided I wanted to match my outfit today, so I added a leopard print to yesterday's manicure...
 |
| My nails painted with Orly - Glowstick and China Glaze - Flip Flop Fantasy. Stamped with Konad M57. |
I used Konad's special black polish to stamp the print and then I topped it with a coat of Seche Vite.
Now this is what I call a fun manicure! What do you think?
Until next time...
Monday, April 29, 2013
Highlighter Explosion
Hi there!
It's been dreary outside lately where I live, so I figured why not offset the weather with a bright manicure!? ...
I painted 1 coat of OPI's Alpine Snow before sponging with Glowstick and Flip Flop Fantasy. I topped it with a coat of Seche Vite to achieve what's pictured.
What comforts you on a stormy day?
Until next time...
It's been dreary outside lately where I live, so I figured why not offset the weather with a bright manicure!? ...
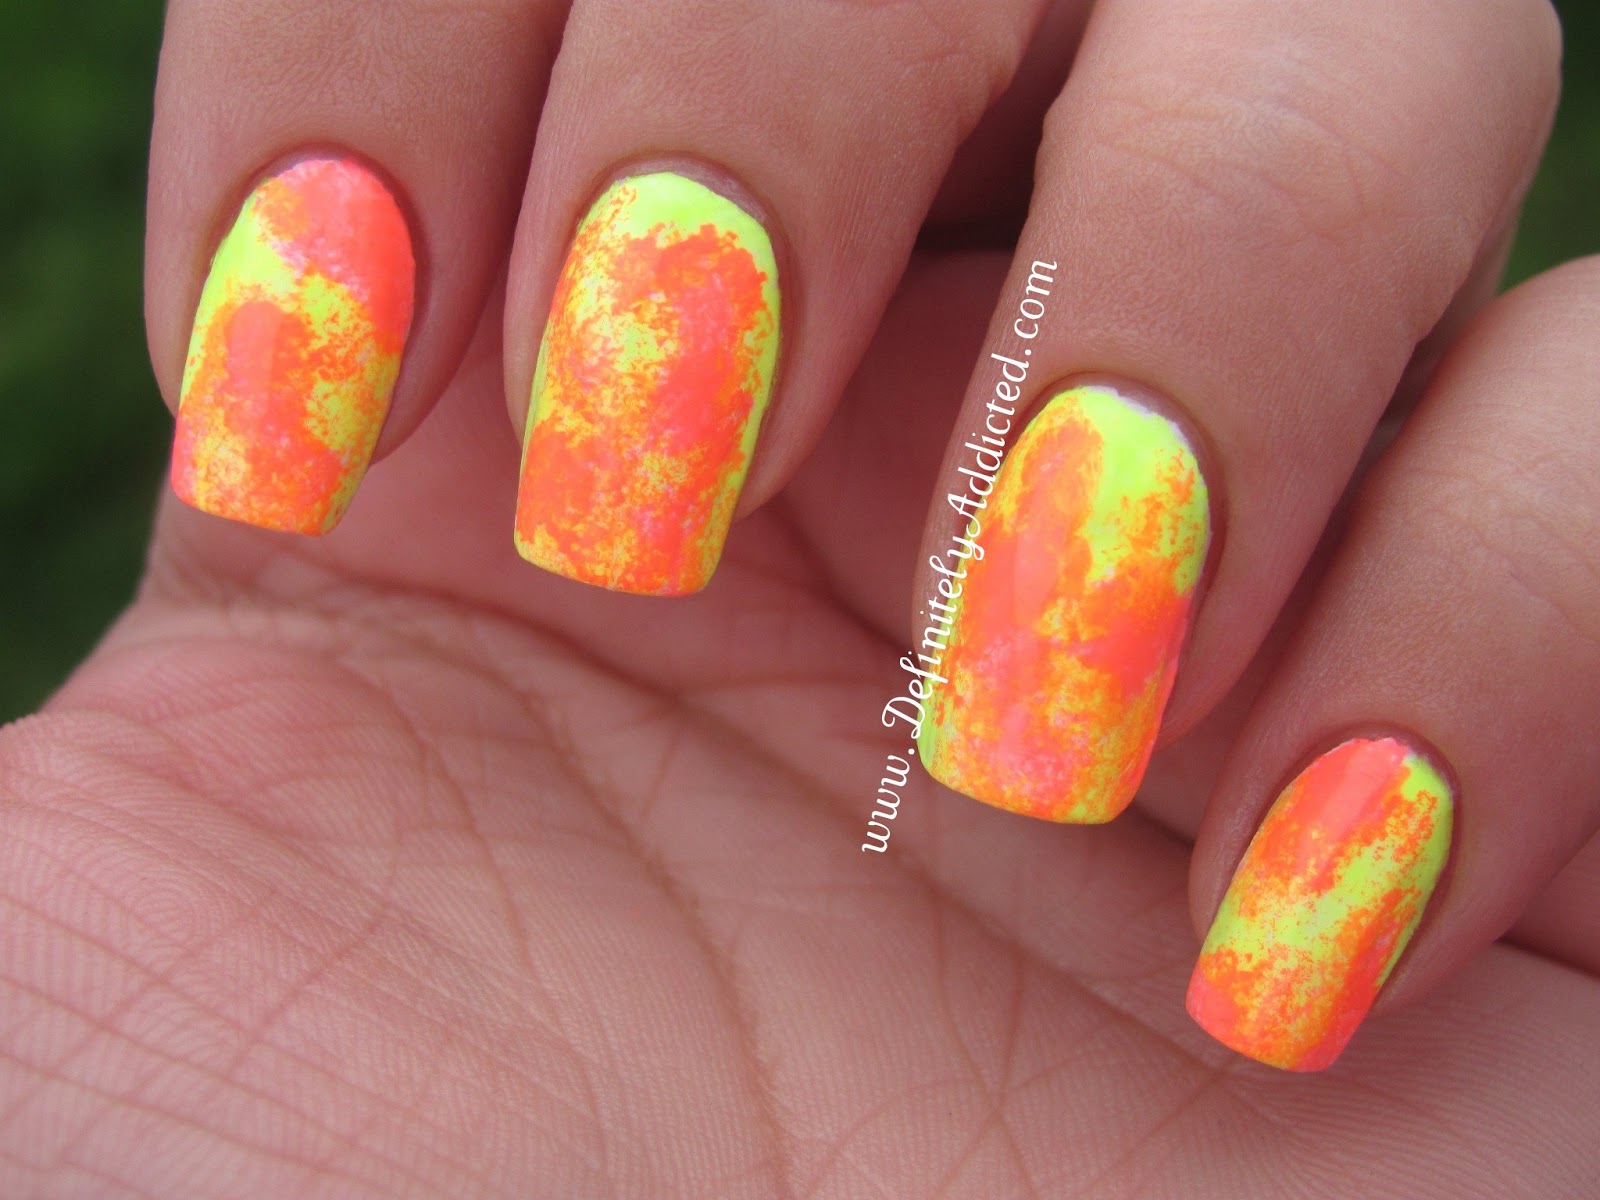 |
| My nails painted with Orly - Glowstick and China Glaze - Flip Flop Fantasy. |
I painted 1 coat of OPI's Alpine Snow before sponging with Glowstick and Flip Flop Fantasy. I topped it with a coat of Seche Vite to achieve what's pictured.
What comforts you on a stormy day?
Until next time...
Thursday, April 25, 2013
Happy Birthday to Me
Hi there!
Today is my Birthday, and the is the manicure I'm rocking...
I painted 1 coat of Halo-Graphic and then I water marbled with both colors. Once I cleaned up around my cuticles, I added a coat of Seche Vite.
I can't help but be happy by this manicure and I can only hope the rest of my day is as awesome as it's been thus far :-)
Cheers to another year!
Until next time...
Today is my Birthday, and the is the manicure I'm rocking...
 |
| My nails painted with Color Club - Beyond and Halo-Graphic. Holographic water marble manicure. |
I painted 1 coat of Halo-Graphic and then I water marbled with both colors. Once I cleaned up around my cuticles, I added a coat of Seche Vite.
I can't help but be happy by this manicure and I can only hope the rest of my day is as awesome as it's been thus far :-)
Cheers to another year!
Until next time...
Wednesday, April 24, 2013
BadAss Polish - Copper Waters
Hi there!
Today I'm wearing another fine glitter polish from BadAss Polish...
I painted 1 coat of China Glaze's Aquadelic as a base for this manicure. Then I painted 2 coats of Copper Waters on all but my ring finger, where I painted only 1 coat. I topped this manicure with a coat of Seche Vite to achieve what's pictured.
The mixture of finely milled copper and blue glitter set in a clear base applied easily. However, much like Chocolate Covered Cherry, I don't recommend wearing a base polish if you intend on building this glitter to opacity... it isn't needed, and a base makes it slightly more difficult to polish near the cuticles.
If you're interested in getting your hands on a bottle of Copper Waters, it isn't in BadAss Polish's shop just yet, but you can check them out on facebook for updates on its release.
Until next time...
(Copper Waters was kindly provided by BadAss Polish for me to play with)
Today I'm wearing another fine glitter polish from BadAss Polish...
 |
| My nails painted with BadAss Polish - Copper Waters. |
I painted 1 coat of China Glaze's Aquadelic as a base for this manicure. Then I painted 2 coats of Copper Waters on all but my ring finger, where I painted only 1 coat. I topped this manicure with a coat of Seche Vite to achieve what's pictured.
The mixture of finely milled copper and blue glitter set in a clear base applied easily. However, much like Chocolate Covered Cherry, I don't recommend wearing a base polish if you intend on building this glitter to opacity... it isn't needed, and a base makes it slightly more difficult to polish near the cuticles.
If you're interested in getting your hands on a bottle of Copper Waters, it isn't in BadAss Polish's shop just yet, but you can check them out on facebook for updates on its release.
Until next time...
(Copper Waters was kindly provided by BadAss Polish for me to play with)
Monday, April 15, 2013
Spring Swirls Water Marble
Hi there!
Here's a quick look at my current manicure...
I painted 1 coat of Lemon Fizz before marbling with both Lemon Fizz and Verbena. I topped this manicure with a coat of Seche Vite, and I'm quite pleased how it turned out. The 2 polishes worked very well together in the water!
Until next time...
Here's a quick look at my current manicure...
 |
| My nails painted with China Glaze - Lemon Fizz and Sinful Colors - Verbena. Spring water marble manicure. |
I painted 1 coat of Lemon Fizz before marbling with both Lemon Fizz and Verbena. I topped this manicure with a coat of Seche Vite, and I'm quite pleased how it turned out. The 2 polishes worked very well together in the water!
Until next time...
Tuesday, April 9, 2013
BadAss Polish - Chocolate Covered Cherry
Hi there!
I've only recently found myself enjoying glitter polishes, and this one surely made me confident in my decision to start giving them more of a chance...
I painted 3 coats and added a coat of Seche Vite to achieve what's pictured. Chocolate Covered Cherry is a finely milled mix of bronze and pink holographic glitter in a clear base.
Chocolate Covered Cherry is buildable, but, of course, it can be worn layered over another polish...
I painted 1 coat of Annette before layering 1 coat of Chocolate Covered Cherry over the top. I didn't use a top coat in this picture.
If you choose to wear Chocolate Covered Cherry as I did in my first 2 pictures, I recommend not wearing a base color (unless it's a darker base that matches the glitter). The picture of it layered over a base color was actually my first time wearing Chocolate Covered Cherry. After seeing what it looked like with 1 coat, I wanted to see how it would look full coverage. I found that it was kind of difficult to get the glitter to cover all of my base color- especially close to my cuticles. I removed it all and tried a second manicure without a base color, and I think it turned out beautifully.
Is Chocolate Covered Cherry something you would wear? Would you wear it by itself, or layered over another polish?
Chocolate Covered Cherry, along with many other great glitter polishes, can be found on Etsy. If you'd like to follow BadAss Polish on facebook, click here.
Until next time...
(Chocolate Covered Cherry was kindly provided by BadAss Polish for me to play with)
I've only recently found myself enjoying glitter polishes, and this one surely made me confident in my decision to start giving them more of a chance...
 |
| My nails painted with BadAss Polish - Chocolate Covered Cherry. |
I painted 3 coats and added a coat of Seche Vite to achieve what's pictured. Chocolate Covered Cherry is a finely milled mix of bronze and pink holographic glitter in a clear base.
 |
| My nails painted with BadAss Polish - Chocolate Covered Cherry. |
Chocolate Covered Cherry is buildable, but, of course, it can be worn layered over another polish...
 |
| My nails painted with BadAss Polish - Chocolate Covered Cherry. |
I painted 1 coat of Annette before layering 1 coat of Chocolate Covered Cherry over the top. I didn't use a top coat in this picture.
If you choose to wear Chocolate Covered Cherry as I did in my first 2 pictures, I recommend not wearing a base color (unless it's a darker base that matches the glitter). The picture of it layered over a base color was actually my first time wearing Chocolate Covered Cherry. After seeing what it looked like with 1 coat, I wanted to see how it would look full coverage. I found that it was kind of difficult to get the glitter to cover all of my base color- especially close to my cuticles. I removed it all and tried a second manicure without a base color, and I think it turned out beautifully.
Is Chocolate Covered Cherry something you would wear? Would you wear it by itself, or layered over another polish?
Chocolate Covered Cherry, along with many other great glitter polishes, can be found on Etsy. If you'd like to follow BadAss Polish on facebook, click here.
Until next time...
(Chocolate Covered Cherry was kindly provided by BadAss Polish for me to play with)
Sunday, March 31, 2013
Mint Chocolate Chip Ice Cream
Hi there!
Today I wore what is now a tradition for me- a mint and black manicure...
With regard to mint chocolate chip ice cream, it kind of looks like the chocolate exploded on my nails... but I don't care. I look at my manicure and I remember my silly dog and his crazy love of the stuff ❤
To see my past mint manicures, click here, and here.
Until next time...
Today I wore what is now a tradition for me- a mint and black manicure...
 |
| My nails painted with China Glaze - Re-Fresh Mint. Splatter Manicure. |
With regard to mint chocolate chip ice cream, it kind of looks like the chocolate exploded on my nails... but I don't care. I look at my manicure and I remember my silly dog and his crazy love of the stuff ❤
To see my past mint manicures, click here, and here.
Until next time...
Sunday, February 3, 2013
49ers Super Bowl Manicure
Hi there!
This is the manicure I'm wearing for the Super Bowl today...
I painted 1 coat of Passion as a base before water marbling with Passion and Red Pearl.
It seems 49ers manicures are in demand. This is what I saw when I opened up my blog's search results page this morning...
It should be no surprise by now that I'll be cheering for the 49ers when they play later on today. We're hosting a big Super Bowl party with lots of good food and even better friends. I hope that no matter who you're rooting for... or even if American football isn't your cup of tea, you have yourself a great day.
Click here to see my other San Francisco 49ers manicures.
Until next time...
This is the manicure I'm wearing for the Super Bowl today...
 |
| My San Francisco 49ers nails. NFL Super Bowl manicure. China Glaze - Passion and Red Pearl water marble. |
I painted 1 coat of Passion as a base before water marbling with Passion and Red Pearl.
It seems 49ers manicures are in demand. This is what I saw when I opened up my blog's search results page this morning...
 |
| 49ers statistics. |
It should be no surprise by now that I'll be cheering for the 49ers when they play later on today. We're hosting a big Super Bowl party with lots of good food and even better friends. I hope that no matter who you're rooting for... or even if American football isn't your cup of tea, you have yourself a great day.
Click here to see my other San Francisco 49ers manicures.
Until next time...
Saturday, February 2, 2013
49ers Decal Manicure
Hi there!
This is the next idea I have for a 49ers manicure...
I painted 2 coats of each polish to achieve what's pictured. With one of my striper polishes, I painted white lines onto my index finger to portray a football. On my ring finger, I simply placed a 49ers sticker.
I'll be posting one more San Francisco 49ers manicure tomorrow morning. Click here to see what I've done so far.
Until next time...
This is the next idea I have for a 49ers manicure...
 |
| My San Francisco 49ers nails. NFL Super Bowl manicure. China Glaze - Red Pearl, OPI, Suzi Loves Cowboys, and Essie - Good As Gold. |
I painted 2 coats of each polish to achieve what's pictured. With one of my striper polishes, I painted white lines onto my index finger to portray a football. On my ring finger, I simply placed a 49ers sticker.
I'll be posting one more San Francisco 49ers manicure tomorrow morning. Click here to see what I've done so far.
Until next time...
Friday, February 1, 2013
49ers Microbead Manicure
Hi there!
This manicure is the first time I've ever used microbeads...
I painted 2 coats of Mandalay Ruby, and while the polish was still wet, I dipped my ring finger into the bead container. I then applied a coat of China Glaze's top coat.
For an easy removal of the beads... paint a coat of top coat (or any other polish), let stand for 20-30 seconds, then place a paper towel/cotton pad/etc. on top of the beads. They'll pull clean off...

To see the other San Francisco 49ers manicures I've done, click here.
Until next time...
This manicure is the first time I've ever used microbeads...
 |
| My San Francisco 49ers nails. NFL manicure. Orly - Mandalay Ruby. |
I painted 2 coats of Mandalay Ruby, and while the polish was still wet, I dipped my ring finger into the bead container. I then applied a coat of China Glaze's top coat.
For an easy removal of the beads... paint a coat of top coat (or any other polish), let stand for 20-30 seconds, then place a paper towel/cotton pad/etc. on top of the beads. They'll pull clean off...

To see the other San Francisco 49ers manicures I've done, click here.
Until next time...
Thursday, January 31, 2013
49ers Striped Manicure
Hi there!
This wasn't my original idea, but I didn't want it to go to waste...
I painted 2 coats of Drive In, 1 stripe of Passion, and 1 stripe of a white striper polish to achieve what's pictured. I intended on doing some stripes with striper tape for this manicure, but the hand cream I forgot I applied earlier in the evening made it so Drive In didn't adhere fully to my nails. When I pulled the tape to readjust it, up came the red polish.
If I had this manicure to do over again, I'd choose colors with the same finishes. Foil, metallic, and cream polishes don't go so wonderfully together :-p
Are you planning on painting a Super Bowl manicure?
I will be posting more San Francisco 49ers manicure ideas over the next couple of days. Click here to see what I've done so far.
Until next time...
This wasn't my original idea, but I didn't want it to go to waste...
 |
| My San Francisco 49ers nails. NFL manicure. China Glaze Drive In and Passion. |
I painted 2 coats of Drive In, 1 stripe of Passion, and 1 stripe of a white striper polish to achieve what's pictured. I intended on doing some stripes with striper tape for this manicure, but the hand cream I forgot I applied earlier in the evening made it so Drive In didn't adhere fully to my nails. When I pulled the tape to readjust it, up came the red polish.
If I had this manicure to do over again, I'd choose colors with the same finishes. Foil, metallic, and cream polishes don't go so wonderfully together :-p
Are you planning on painting a Super Bowl manicure?
I will be posting more San Francisco 49ers manicure ideas over the next couple of days. Click here to see what I've done so far.
Until next time...
Wednesday, January 30, 2013
49ers French Manicure
Hi there!
These are the Niners nails I thought I would wear today...
I painted 1 coat of Good As Gold and then painted a stripe of Ruby Pumps.
During the wee hours of this morning, insomnia took the best of me...
I don't think my addition of the nail art pen "49ers" made my manicure look terrible, but I'm not fond of the font. I also don't like that the pen got stuck in a ridge on my pinky nail and I slopped up my "s."
An important note... as soon as possible, use top coat over the nail art pen! I went to put some things away and then realized I no longer had numbers or letters written on my nails. Instead, there were black smudges all over my fingers.
I will be posting more San Francisco 49ers manicure ideas later this week. Click here to see what I've done so far.
Until next time...
These are the Niners nails I thought I would wear today...
 |
| My San Francisco 49ers nails. NFL manicure. Essie - Good As Gold and China Glaze - Ruby Pumps. |
I painted 1 coat of Good As Gold and then painted a stripe of Ruby Pumps.
During the wee hours of this morning, insomnia took the best of me...
 |
| My San Francisco 49ers nails. NFL manicure. Essie - Good As Gold and China Glaze - Ruby Pumps. |
I don't think my addition of the nail art pen "49ers" made my manicure look terrible, but I'm not fond of the font. I also don't like that the pen got stuck in a ridge on my pinky nail and I slopped up my "s."
An important note... as soon as possible, use top coat over the nail art pen! I went to put some things away and then realized I no longer had numbers or letters written on my nails. Instead, there were black smudges all over my fingers.
I will be posting more San Francisco 49ers manicure ideas later this week. Click here to see what I've done so far.
Until next time...
Tuesday, January 29, 2013
49ers Fishtail Braid Manicure
Hi there!
I'm really enjoying this manicure...
I painted 1 coat of Sienna to start... then I painted a stripe of Glenn, a stripe of Johnny, a stripe of Sienna, etc. until I was satisfied with the amount of stripes on my nails. I topped this manicure with a coat of Seche Vite.
Have you worn a fishtail braid manicure before? What colors did you use?
I will be posting more San Francisco 49ers manicure ideas over the next week. Click here to see what I've done so far.
Until next time...
I'm really enjoying this manicure...
 |
| My San Francisco 49ers nails. NFL fishtail braid manicure. Julep - Sienna, Glenn, and Johnny. |
I painted 1 coat of Sienna to start... then I painted a stripe of Glenn, a stripe of Johnny, a stripe of Sienna, etc. until I was satisfied with the amount of stripes on my nails. I topped this manicure with a coat of Seche Vite.
Have you worn a fishtail braid manicure before? What colors did you use?
I will be posting more San Francisco 49ers manicure ideas over the next week. Click here to see what I've done so far.
Until next time...
Monday, January 28, 2013
49ers Splatter Manicure
Hi there!
I'm back just in time for the Super Bowl. And guess what!? The San Francisco 49ers made it!
I painted 2 coats of OPI's Danke-Shiny Red before splattering with Essie's Good As Gold and Wet n Wild's Ebony Hates Chris. I topped it with a coat of Seche Vite.
Splatter manicures can definitely be interesting. Look at what the gold did...
It completely missed my nail! ... But I think it looks neat :-)
Here's what my right hand looked like (sorry for the cell phone picture)...
I painted this manicure back in October when we went to see the Niners play at Candlestick Park. It was so much fun. We had the best seats anyone could ever wish for, and the 49ers won!
I'll be posting more San Francisco 49ers manicure ideas over the next week. Click here to see what I've done so far.
Until next time...
I'm back just in time for the Super Bowl. And guess what!? The San Francisco 49ers made it!
 |
| My San Francisco 49ers nails. NFL splatter manicure. |
I painted 2 coats of OPI's Danke-Shiny Red before splattering with Essie's Good As Gold and Wet n Wild's Ebony Hates Chris. I topped it with a coat of Seche Vite.
Splatter manicures can definitely be interesting. Look at what the gold did...
 |
| My San Francisco 49ers nails. NFL splatter manicure. |
It completely missed my nail! ... But I think it looks neat :-)
Here's what my right hand looked like (sorry for the cell phone picture)...
 |
| My San Francisco 49ers nails. NFL splatter manicure. |
I painted this manicure back in October when we went to see the Niners play at Candlestick Park. It was so much fun. We had the best seats anyone could ever wish for, and the 49ers won!
I'll be posting more San Francisco 49ers manicure ideas over the next week. Click here to see what I've done so far.
Until next time...
Subscribe to:
Posts (Atom)
